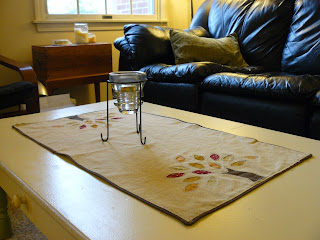
Now we're back in Michigan and excited for the fall season, which in the blink of an eye has already arrived! To welcome the season, I tried out a new technique - reverse applique - to make a table runner/placemat for our coffee table. Here's the how-to!
Materials:
2 rectangles of main fabric (mine started out 29x16 inches each)
scraps for trunk and leaves (I used brown, red, orange, yellow, and green)
paper to be used for stencil
washable fabric pencil
pins
sewing machine
thread to match main color
sharp small scissors
*I apologize for the low-quality photos. I guess I tend to craft more at night, when the lighting in my apartment is worst.
1. Draw or print out the design you want. I made up my own tree design. The simpler the better!
2. Make a stencil out of your paper drawing. Pin this to the right side of one of the main fabric rectangles. Make sure to keep in mind there will be a 1/2 inch seam allowance around the whole thing.
3. Using the fabric pencil, trace the stencil.
4. Find a scrap big enough for the tree trunk. Place this RIGHT SIDE UP underneath the main fabric. Pin in place.
5. At your machine, sew along the pencil lines. I used the smallest stitch possible (1.4) which will help prevent fraying.
6. Trim your threads. On the back side, cut away the brown fabric as close to the stitching as you are comfortable.
7. Repeat the process for each leaf. Originally, I planned to have one larger piece of fabric, green for example, to place across the whole back, then I could sew each green leaf on the front. Like this:
This I found to waste a lot of fabric, so for the rest of the colored leaves I just cut individual small rectangles of fabric, then sewed them each individually.
8. Once all your pieces are sewn on, it's time to cut away the main fabric! On the front side, pull up on the main fabric so that you're only pinching that layer, not the colored layer behind it. Make a small snip with your sharp scissors. Then cut away the fabric, following pretty close to the seam. Do this for each leaf piece.
9. The reverse applique part is done! For my table runner, I made an identical tree on the other end. At this point, it might be a good idea to hand wash the top, so that the fabric pencil lines are gone.
10. Putting together the top and bottom pieces were the hardest part for me, since I was set on having a brown border around the edge. I never did find a great method for this, so I'll skip this part and just tell you how to finish the edges plain. Pin together your appliqued top to the plain rectangle, right sides together. Stitch around all edges with 1/2 inch seam allowance, but stop a few inches short of where you started.
11. Take it off the machine, clip the seam allowance on your corners, and pull it right-side out.
 12. Press around all sides, making sure to tuck in the raw edges around your opening.
13. Top-stitch about 1/4 inch inside the edge, all the way around. Done!
Next on our project list is stripping this coffee table and restaining it. That way the table runner will match better than it does now!
Any questions or comments, please let me know!


1 comment:
Welcome back to Michigan! This table runner looks amazing and perfect for Fall! Thanks for telling me about the Allegan Market...that is seriously right up my alley. And that is really cool that you grew up with parents who loved antiquing as well. :) Hope all is well, can't wait to see the refinished table!
Post a Comment